
|
|
#41
 05-25-2011, 10:30 PM
|
||||
|
||||
|
Quote:
Initially, I could move the P/V actuator about 7mm before I could feel the spring tension. 
|

|
#42
05-26-2011, 07:27 AM
|
|||
|
|||
|
Quote:
|
|
#43
06-18-2011, 08:51 AM
|
|||
|
|||
|
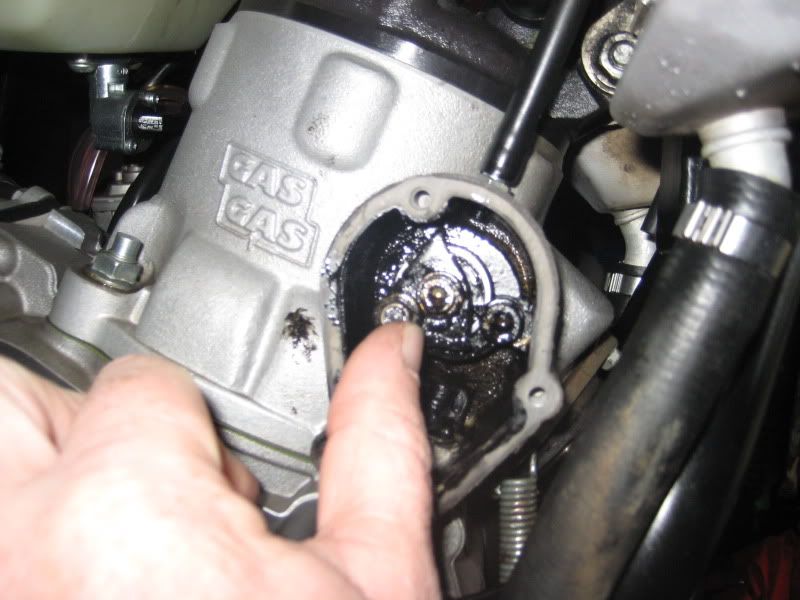
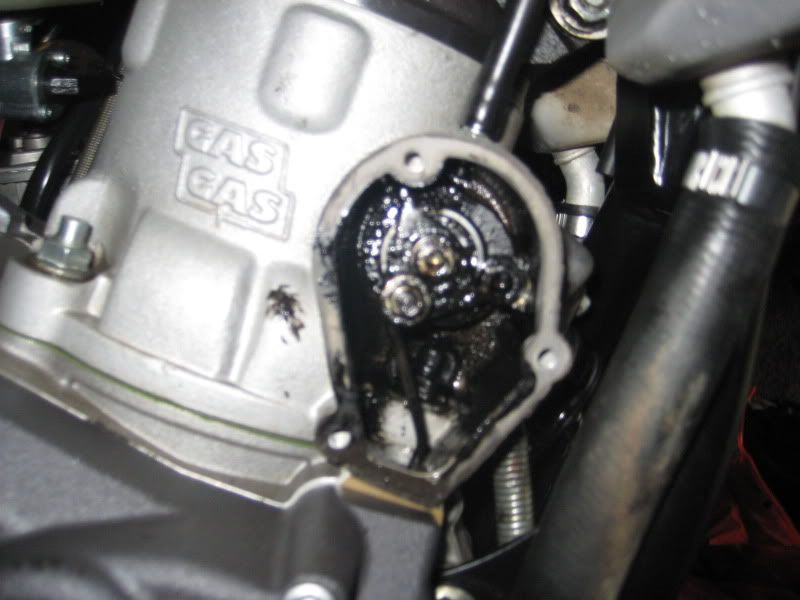
Hi guys, i have just checked my PV and not sure if i need to adjust it, i have attached a couple of pics, the Actuator plate is against the stop but there is a bit of slop approx 4-5mm I before i feel tension, is this normal or should i adjust all free play out. I have heard a bit of a rattle at low speed and had some jetting issues, i have a Trusty Adjustable power Valve to install but want to have the bike running perfect before i install it.
   2010 CC250
|
|
#44
06-18-2011, 11:36 AM
|
||||
|
||||
|
From your pictures (& I'm no expert) it doesn't look like it's tight enough against the stop. As I understand it needs to be resting against the stop (allen head) with about .005-.010 tension on it. That's why you use the feeler gauge in GMP's directions.
__________________
Fred Overstreet 2010 EC250 SixDays 2004 GasGas EC300 -Sold to a good home 2006 GasGas EC250-Sold to a good home 2006 GasGas TXT 280 Pro 
Last edited by Fred1956; 06-18-2011 at 11:37 AM. Reason: spelling
|
|
#45
06-18-2011, 06:57 PM
|
||||
|
||||
|
Assuming that all the play shown is free and not against the PV governer spring, its sloppy and could use an adjustment. Remember this has nothing to do with free play in the flap/drums/rods, that is fixed by design and tolerances. This adjustment is like a reset to absolute zero position, at zero RPM. If its grossly off, like it was in my '03, the PV floats around rattling on the stop, and starts to open too soon.
Its like setting up a KTM PV after a top end R&R if you have ever done one, except there is no adjustable heim joint at the actuator, the bellcrank position/setscrew does the same thing. Keep in mind that overall deck height effects this slightly. If your bike came with a big stack of base gaskets, and you removed all but one .3mm, the PV rod height in relation to the cyl in now higher and you will now have slightly more PV offset in the open direction. KTM makes a bigger deal about this and adjusting for it, but their PV is different. The GG PV is simple and tough, and its impossible for the main flap to hit the piston at any position. Perhaps the variable is from the factory setting the bellcrank position in the lower ends to a fixed spec, and then as they add top ends and various base gaskets to suit a desired compression level, the final overall PV starting position may not be absolute zero.
|
|
#46
06-30-2011, 05:50 PM
|
|||
|
|||
|
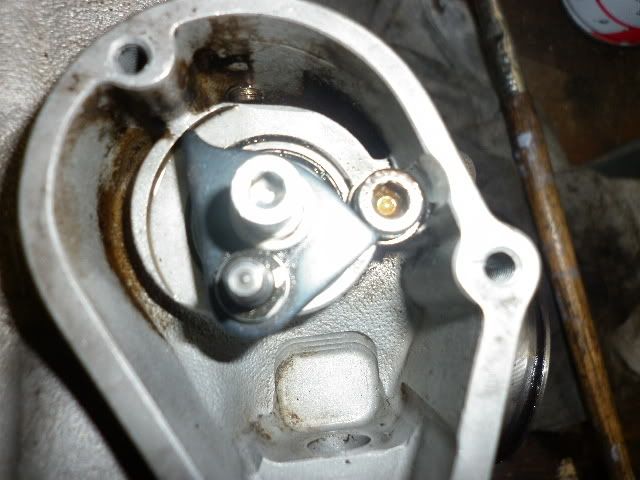
I have a brand new '11 250EC but wanted a 300 so the dealer gave me a 300 jug to swap for the 250
I have stripped the original jug and installed the PV and to 300cc jug on the bike. There didn't seem to be any space between the actuator plate and the hex stop when installed on the 250, but now my PV actuator looks like the picture powervalveplate.jpg Is the space between the lower right point of the actuator and the bolt the "slack" that is being talked about and needs to be adjusted out? Could changing from 250 to 300 have caused the gap to open up? I'd like to clarify the directions for the adjustment: "Hold/jam the PV actuator plate up on the cyl closed"....not clear on this...is this the longer point of the plate i.e. the "top" of the black triangle against the top of the hex bolt stop (flapper up and exhaust max open) or is it the lower right short point of the black triangle against the bottom left of the hex (flapper max down and exhaust max closed)? I take it to mean the latter and that the PV flapper in the exhaust port should be maximally closed....CORRECT? I'm not sure if I'm trying to elimnate the space between the lower right point actuator and the hex bolt stop with the motor at rest. With the space seen in the photo attached, I take it to mean that my power valve is not closing all the way and will be open at lower throttle settings. Confused 
|
|
#47
06-30-2011, 06:19 PM
|
||||
|
||||
|
You are correct. You want the lower right hand part in your picture to be up against the bolt/stop while the bike is at rest which is also = power valve fully closed. I don't have the arm connected in this pic as the jug is on the bench top, but thats the position you're looking for with the bike at rest, everything assembled. You want enough tension on it so that it holds itself there under idle.
|
|
#48
06-30-2011, 07:03 PM
|
|||
|
|||
|
....and the preload on the governor is to provide just that, correct? Where do I insert the shim or feeler gauge for the preload? Between the shims and roller bearing beneath the ball and ramp (Rekluse
 ) assembly of the governor? ) assembly of the governor?How do you ensure the flapper is fully down? Just visually or is full down defined by the orientation of the D shaped slot in the actuator plate when pressed up against the hex bolt stop...... ahhhhhh....I think I am starting to see now. Thanks
|
|
#49
06-30-2011, 09:07 PM
|
|||
|
|||
|
pushrod.jpg
After slacking off the set screw, I still could not get the actuator plate to contact the hex bolt (you can still see the gap as I am attempting to seat the plate to the bolt)....next, I removed the rod end from the belcrank entirely and found that the resistance was coming from the pushrod binding on the passage between the powervalve chamber on the side of the cylinder and the chamber under the right side cover......you can see that in the photo too. Solution seems simple enough.....just bend the rod so that it no longer binds and has full travel! I just want to make sure I'm not missing something here....I checked the fiche and 250 and 300 use same rod and belcrank so I think maybe I bent the rod removing the 250 jug.....should be no problem to just bend it back....right? Glad I stumbled on this thread or I wouldn't even have thought to check it and been running my bike with a stuck powervalve and not even known the difference! Thanks for any comments....feeling like I need some reassurance here before I fire up a brand new motor.
|
|
#50
06-30-2011, 09:33 PM
|
||||
|
||||
|
My pushrod also touches the outer edge of the hole in the cylinder. It shouldnt bind. I haven't had my side cover off to know much about the setup downstairs, but I believe thats where you set your position and tension. You could bend the pushrod a little but thats kind of the back door fix.
The powervalve will be at fully closed when the actuator plate is hard up against the bolt head. and fully open at the other end.
|
 |
|
|
 Similar Threads
|
||||
| Thread | Thread Starter | Forum | Replies | Last Post |
| Low down / tickover issue HELP | stevehipkiss | Enduro Intake/Carburetion - 2 stroke | 9 | 02-14-2011 09:03 AM |
| jetting - idle issue. | stainlesscycle | Enduro Intake/Carburetion - 2 stroke | 7 | 12-30-2009 02:47 AM |
| clutch issue | boostedte37 | General Discussions & Announcements | 2 | 11-09-2009 06:58 PM |
| ec 400 gearbox issue | Paul Somerville | Enduro Engine 4 stroke (including EFI & Exhaust) | 3 | 09-05-2009 10:17 AM |
| PowerValve Issue- Take A look at this Picture | alexpp | Enduro Engine - 2 stroke | 13 | 04-12-2009 12:13 AM |


 Linear Mode

