


By Dave Smith
Quick Release Seat Project
First off, why bother with a quick release seat? Electric start four-stroke riders get almost instant access to the battery. Many two-stroke riders end up with a great place to store tools. It's also a lot easier to clean the air box with the seat off.
Late model Husky and KTM mini owners already have this feature and this project is modeled after the latter. In fact, the project bike, a 2003 Gas Gas EC300, uses the quarter-turn fastener and plate straight off of a KTM 65SX (boy, was my son mad). Once finished, the seat can be removed in about five seconds.
This project requires very little in the way of materials, but quite a few tools and a bit of time. To keep typing to a minimum the fabrication process will tend to be illustrated rather than described.
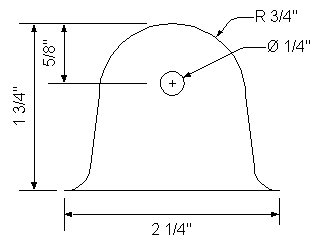
To begin with make an aluminum template along the lines of the dimensioned drawing to the right. Notice in the picture below a tab was added along the bottom. This makes the template easier to handle and acts as a guide when clamping. The template serves several purposes. First as a way to mark the seat foam for cutting and also to mark the seat cover for glueing. When used to clamp the seat cover in place it gives a factory look to the cut out. Lastly, it works as a guide for drilling the seat base to accept the quarter turn fastener.
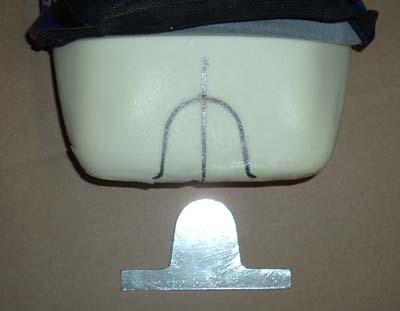
The seat cover needs to be pulled back an inch or so past the mounting brackets. Hopefully a heavy duty stapler is at hand so the cover can be replaced. Use the template and a broad marker to mark the seat foam for cutting. Cut the foam along the outer edge of the mark with a SHARP knife. If the foam was glued to the base remove any glue residue.
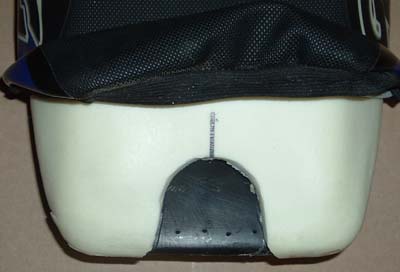
Here's a picture with the foam removed. Now is a good time to remove the seat mounting brackets. A 1/4" bit makes short work of the aluminum rivets and since the seat cover is pulled back it won't matter if the drill punches through. As a trial run pull the seat cover in to place and check the fit.
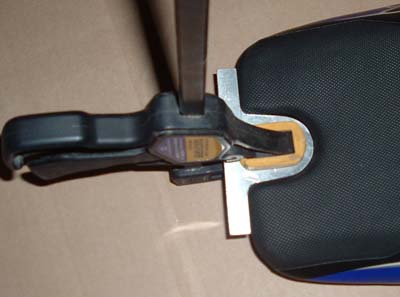
Straighten (get rid of the wrinkles) the seat cover and use the template to mark the underside of the cover for gluing with "Three Bond" "1521" or other rubber adhesive. Brush a coating in the seat base cut-out area and on the underside of the seat cover and let dry for about five minutes. Now carefully pull the seat cover back in to place. Staple the cover down, but avoid putting staples along the cut-out as there is no longer any foam there. Put the template in to position and clamp it in place. Keep the clamping force to a minimum so as not to force all of the adhesive out. Let it dry at least 4 hours.
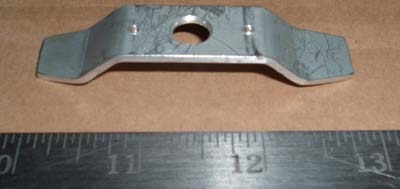
Now it's time to fabricate a bracket. This one was made on the fly so there isn't any form of dimensioned drawing. The center hole needs to be 7/16" (the one in the picture is about 3/8") and the smaller holes are 9/64" to accept 1/8" pop rivets. Not shown are a 15/64" hole in each mounting tab for fastening to the fender. When bent properly there will be about 1/4" clearance between the underside of the bracket and the rear fender and the tabs will match the radius of the fender. Attach the quick release plate to the underside of the bracket with two pop rivets. See the image below.
Once the adhesive has dried the seat can be drilled. Use the template as a guide for a 1/4" bit. Now take the seat and install it on the bike. Hold a pen or marker perpendicular to the seat base and mark the rear fender through the hole in the cut-out. Remove the seat and set the bracket on the fender (it won't sit flat now that the plate is mounted), center it on the mark and trace around the quick release plate. To be safe remove the rear fender and move to an area that doesn't have flammable liquids around . Then take a propane torch on VERY LOW heat and soften the fender, working from above and below. Use a 1/2" socket extension to push the plastic down making room for the plate and the "threaded" quarter turn fastener that passes through it. Work slowly, it will probably take several attempts to get the required clearance.
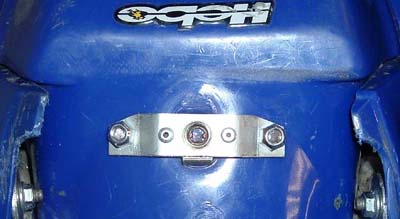
Re-install the fender and set the bracket in place and tape the tabs down. Set the seat in place and check to see that the bracket is centered. Adjust and re-tape until it's right. Drill the fender using the holes in the bracket tabs. Mount the bracket with M6 machine screws. Put the large plastic washer on the quick release fastener, push the fastener through the seat and finally install the locking washer. Install the seat and you should end up with something like this:


copyright 2006 - gasgasrider.org