


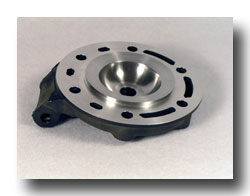

By Ron Black of RB-Designs
Introduction
Squish band thickness is the distance between the piston and the cylinder head where the piston meets the cylinder bore. If the squish clearance and width is set to an optimal amount, then the fuel is burned efficiently. If the squish distance is too great then the fuel in the squish band is not burned and the engine runs very “dirty”. It is inefficient and does not produce optimal power.
The squish band is a very important part of head mods and this is where I spend alot of time. Just getting the proper squish band without going overboard on the compression will give great results - Delivering “HORSEPOWER” and “RELIABILITY”
Head modification is more than just raising compression. It is a way to help your engine breath, burn more of the available fuel, and help cool. All of this will give you better snap, rev and torque with great reliability.
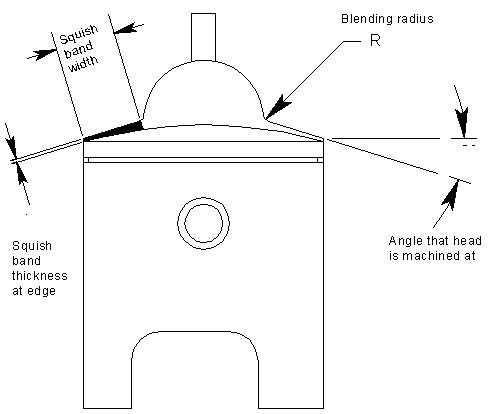
If the squish band thickness is not optimal, the cylinder head can be machined to correct this clearance. After the new squish clearance is achieved the head is then cc’ed and the combustion chamber is re-machined to the desired compression to meet the owner’s needs. It is also necessary for the owner to provide an accurate baseline compression measurement. The head is then machined to set proper squish and the combustion chamber is reshaped to provide the desired amount of compression.
Overall compression and compression ratios are typically set up for proper operation at sea level. Low air densities at higher altitudes will, in turn, lead to low compression readings. If the bike’s owner knows that they will not venture to lower altitudes - the head can be machined to provide appropriate compression for their altitude range.
Compression can be “set” higher if the rider wishes to use race fuel. It should be noted that increasing compression will shift power lower in the power band - giving up top end power along the way (all other things equal). So “more” isn’t always better, it depends on what you wish to achieve.
GasGas Specific Information
Measurements performed by customers show that the squish clearance on the gasgas enduro 200, 250 and 300s are set up very “loose” with 2.0-2.5 mm of squish clearance on most bikes. Measured compression is also slightly on the low side. It might be set up this way from the factory to accommodate low octane fuels.
Different base gaskets are used on the gasgas to set deck height. Deck height is the distance from the top of the piston to the top of the cylinder liner. Three gaskets are available from gasgas and differing combinations of gaskets are used depending on factory assembly. There are three gaskets available :
- A light brown gasket that is .15mm thick,
- A green gasket that is .30 mm thick
- A dark grey gasket that is .50 mm thick.
Changing the base gaskets will also effect squish, but it will also change port timing. In addition it has a slight effect on engine compression. For example, using one of the thinner base gaskets would increase compression slightly (a few pounds) and the modified port timing would slightly boost bottom end response while sacrificing top end power delivery.
One could continue to use the factory supplied combination of gaskets (the factory set it up this way), or they could simply switch to the single .5mm gasket. One base gasket would reduce the possibility of gasket failure in this location.
Accurate Compression Testing
First you need to get a hold of a "GOOD" known compression gauge. I recommend something like a SNAP-ON or MAC TOOLS. Start the bike and run it until it is at full operating temperature. Then do a compression check on your engine. This is performed by installing the compression gauge into the spark plug hole. Then hold the throttle wide open and kick the engine over vigorously several times until the gauge needle no longer moves. Record the gauge reading, do this two to three times. With the spark plug removed, squirt a little WD-40 down the spark plug hole, then kick the engine over several times. This compensates for ring wear. Now re-install the compression gauge and repeat the compression test two to three times and record these numbers.
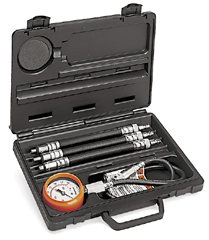
If you can not get a good compression gauge to perform the above test it is OK and I will just use my best judgment on what I do for your finished head volume.
Read and understand the following before measuring squish
These test solders are my only link into your engine so that I know what needs to be done without actually having the engine in front of me. So, it is very important that you pay close attention to the process and do the solder tests with great care. Your head will be modified using these solders that you have provided me.
As you can see in the example pic below, the solder lays flat across the top of the piston with a small "camel hump" that also lays flat on the piston. The reason for the small hump is to allow you to either pull the ends farther apart or push the ends closer together, to get the ends of the solder to rub on the cylinder wall. The hump of the solder is to lay flat on top of the piston also, this will keep the solder from moving around (you can put a small dab of grease on the hump to help hold it in place).
It is also very important that the hump shape of the solder does not come in contact with the squish band area.
One last note before you go on to the actual Measuring Squish , make sure that the ends of the solder touch the cylinder wall on both sides and that both ends are cut blunt and clean. Again I can not stress enough the importance of the solder tests, send at least 2 to 3 tests, they are easy to do.
Measuring Squish
The best and easiest way to measure the squish is by using a piece of rosin-core-solder. You can buy this from local hardware stores or places like radio shack. The solder needs to be thick enough to smash slightly but not so thick as to bind the engine. After you do it a few times, you will get the hang of it.
On the stock GasGas head the clearance is usually around .090+” so this means you will need your piece of solder to be 3/32” or .093” to .125”, If you can not find 3/32” rosin-core-solder, try and find 1/8” rosin-core or acid-core solder. DO NOT use solder such as the types used for plumbing.
You will need to remove the head and remove the flywheel side cover so that you can access the flywheel nut to rotate the crankshaft (in most cases you can rotate the flywheel by hand) Do Not use the kick starter. Now rotate until the piston is about 1/4” to 3/8” below top dead center (TDC).
You will then need to bend the solder into a shape shown in photo 1. The solder needs to lay right across the center line of the piston pin. Make sure the ends of the solder touches the bore of the cylinder on both sides. You can use a small dab of grease on the hump shape that should be laying flat on the top of the piston.
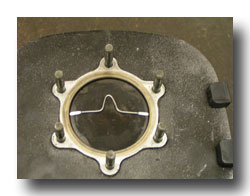
Solder in cylinder
Next install the head and snug it down with the head nuts. Note that you do not need to install the o-ring during this process. DO NOT use the kickstarter to rotate the engine. Remove the spark plug. Using a wrench on the crankshaft nut carefully turn the crank shaft rotating the piston over TDC, you will feel a slight bind and this is normal. Keep the piston near TDC throughout the process. There is absolutely no need to move the piston any lower than 1/4" below TDC. Do not allow the piston to pass below the ports. Slowly rotate back and forth through TDC a couple of times couple of times and then remove the head.
You will see where the solder was smashed and this is your current squish band clearance. It can be measured with calipers. You will need to send this to me with the head so I can re-cut your head for a closer clearance.
Hope this helps, oh and by the way you may want to smash several pieces of solder and send them all. NOTE!!!!! You must use Rosin Core or acid core Solder not solid or plumbing solder (solid core will not smash as well, and the reading will not be correct as there will be a preload that won’t measure).
Summary
The above measurements are needed so I can reduce the squish clearance. This is where the power, torque, gas mileage and reliability is to be found. I don't just go with more compression. I also re-do the combustion chamber to maintain the proper trapped combustion volume. You will not give up any reliability or shorten engine life with this mod.
The cost for the modification is $75 (U.S.) not including shipping and handling to Portland, Oregon, U.S.A. For more information, please visit our website at www.rb-designs.com .
|
About the Author : Ron Black of RB-Designs has been building race engines of all kinds and his own custom race parts since 1970. He gained experience working side by side with many “old school engineers”. He has built 3 dyno's and has been running them since the early 70's. He has one of these dynos in his shop. Over the years, he designed a number of motorcycle service departments and managed many of these. He designed his brother’s shop and worked with him for about 12 years prior to starting his own shop 10 years ago. He has worked with both the Yamaha Road Racing Team and with Kawasaki’s motocross R&D department. He has spent the majority of his life designing reliable high performance parts. |
What Members have said about RB-Designs Head Mods...
|
GMP - Glenn Plokhoy |
|
|
|
Eric K - Eric Kangas |
|
|

copyright 2006 - gasgasrider.org